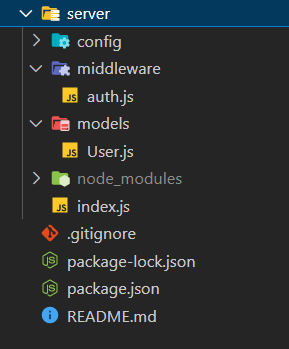
프로젝트 구조를 살펴보자면 아래와 같다.
✅ 초기 설정
express를 가져오고 express를 활용해 app을 만들어 준 뒤, 포트 번호를 5000번으로 설정해 준다.
const express = require("express"); // express를 가져온다.
const app = express(); // express를 이용해서 app을 만들어준다.
const port = 5000; // port 번호를 5000번으로 설정
다음으로, bodyParser와 토큰을 저장할 cookieParse도 다운로드하고 불러온다.
앱에서 사용한다고 설정도 같이 해준다.
const bodyParser = require("body-parser");
const cookieParser = require("cookie-parser");

// application/x-www-form-urlencoded
app.use(bodyParser.urlencoded({ extended: true }));
// application/json
app.use(bodyParser.json());
app.use(cookieParser());
✅ MongoDB 연결
mongoose는 mongoDB를 쉽게 사용할 수 있게 해주는 라이브러리로 가져온 뒤
몽구스를 이용해서 mongoDB에 연결해 준다.
const mongoose = require("mongoose");
mongoose // 몽구스를 이용해서 mongoDB에 연결
  .connect(config.mongoURI, {
    useNewUrlParser: true,
    useUnifiedTopology: true,
  })
  .then(() => console.log("MongoDB Connected..."))
  .catch((err) => console.log(err));
✅ 유저 Model
다음으로 로그인, 회원가입 등의 기능을 구현할 것이기 때문에 유저 모델 스키마를 만들어준다.
몽구스를 가져와 유저 스키마를 생성해준 뒤 스키마를 모델로 감싸줘 다른 곳에서도 사용할 수 있도록 export 해준다.
// models/User.js

const mongoose = require("mongoose"); // 몽구스를 가져온다.

const userSchema = mongoose.Schema({
  name: {
    type: String,
    maxlength: 50,
  },
  email: {
    type: String,
    trim: true, // 스페이스를 없애주는 역할
    unique: 1, // 중복을 허용하지 않는다.
  },
  password: {
    type: String,
    minlength: 5,
  },
  lastnmae: {
    type: String,
    maxlength: 50,
  },
  role: {
    // 관리자와 일반 유저를 구분하기 위한 역할
    type: Number,
    default: 0, // 0은 일반 유저, 1은 관리자
  },
  image: String,
  token: {
    type: String,
  },
  tokenExp: {
    type: Number,
  },
});

const User = mongoose.model("User", userSchema); // 스키마를 모델로 감싸준다.

module.exports = { User }; // 다른 곳에서도 사용할 수 있도록 export 해준다.
✅ 회원가입 기능
먼저, 유저 모델 스키마를 가져온다.
다음으로 body parser을 이용해 json형식으로 요청 body를 가져오고 유저 인스턴스를 생성해 준다.
만약 에러라면 success를 false로 응답을 보내고, 성공이라면 status 200으로 success ture로 응답을 보내준다.
// index.js

const { User } = require("./models/User.js"); // 모델 스키마 가져오기

app.post("/api/users/register", (req, res) => {
  // 회원 가입 할 때 필요한 정보들을 client에서 가져오면 그것들을 데이터베이스에 넣어준다.
  const user = new User(req.body); // body parser를 이용해서 json 형식으로 정보를 가져온다.

  user.save((err, userInfo) => {
    // 몽고디비에서 오는 메소드
    if (err) return res.json({ success: false, err });
    return res.status(200).json({
      // status(200)은 성공했다는 뜻
      success: true,
    });
  });
});
그러나 여기서 한 가지 빠진 것! 비밀번호를 암호화해야 된다.
스키마에서 pre라는 메서드를 사용해 save 하기 전에 비밀번호를 암호화할 것이다.
비밀번호를 암호화시키기 위해 bcrypt를 불러온 뒤, salt를 몇 글자로 할지 정한다.
(여기서 salt란 무작위로 생성된 문자열을 뜻한다)
비밀번호를 바꿀 때만 암호화를 시키고 비밀번호를 바꾸지 않았다면 그냥 넘어가도록 만들었다.
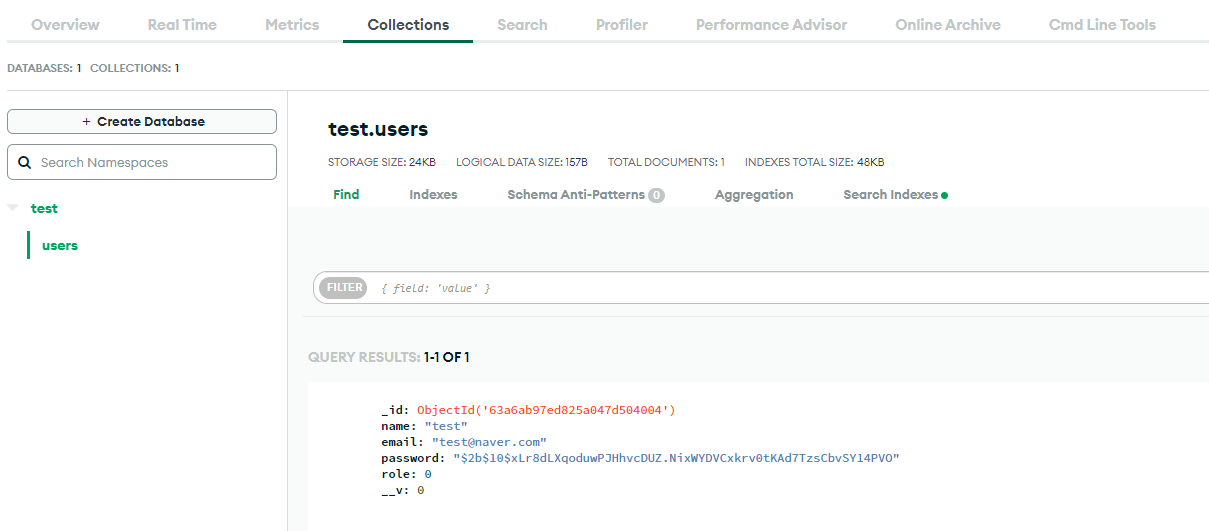
이처럼 비밀번호를 암호화했다면 user의 password를 암호화 한 채 MongoDB에 저장하게 된다.
// models/User.js

const bcrypt = require("bcrypt"); // 비밀번호를 암호화 시키기 위해
const saltRounds = 10; // salt를 몇 글자로 할지

// save하기 전에 비밀번호를 암호화 시킨다.
userSchema.pre("save", function (next) {
  const user = this;
  // 비밀번호를 바꿀 때만 암호화 시킨다.
  if (user.isModified("password")) {
    bcrypt.genSalt(saltRounds, function (err, salt) {
      if (err) return next(err);
      bcrypt.hash(user.password, salt, function (err, hash) {
        if (err) return next(err);
        user.password = hash;
        next();
      });
    });
  } else {
    next();
  }
});
회원가입 성공, 비밀번호 암호화 성공
✅ 로그인 기능
다음으로 로그인 기능을 구현해 보겠다.
먼저, MongoDB에 요청된 이메일이 데이터베이스에 있는지 찾는다.
이메일이 있다면 비밀번호가 맞는 비밀번호인지 확인을 해야 되는데 비밀번호를 비교하는 메서드가 필요하다.
메서드는 아래에서 살펴보고, 응답 온 것이 맞다면 토큰을 생성해 준다. 토큰을 생성해주면 저장해서 보관해야 되는데 쿠키, 로컬스토리지, 세션 등등의 공간이 있다. 이번 프로젝트에서는 쿠키에 저장을 할 것이고 cookie-parser를 사용해 x_auth라는 이름으로 token을 저장해 준다.
// index.js

app.post("/api/users/login", (req, res) => {
  // 요청된 이메일을 데이터베이스에 있는지 찾는다.
  User.findOne(
    {
      email: req.body.email,
    },
    (err, user) => {
      if (!user) {
        return res.json({
          loginSuccess: false,
          message: "이메일에 해당하는 유저가 없습니다.",
        });
      }
      // 요청된 이메일이 데이터 베이스에 있다면 비밀번호가 맞는 비밀번호인지 확인
      user.comparePassword(req.body.password, (err, isMatch) => {
        if (!isMatch) {
          return res.json({
            loginSuccess: false,
            message: "비밀번호가 틀렸습니다.",
          });
        }
        // 비밀번호까지 맞다면 토큰 생성
        user.generateToken((err, user) => {
          if (err) return res.status(400).send(err);
          // 토큰을 저장한다. 어디에? 쿠키, 로컬스토리지, 세션 등등
          res
            .cookie("x_auth", user.token)
            .status(200)
            .json({ loginSuccess: true, userId: user._id });
        });
      });
    }
  );
});
비밀번호 비교하는 메서드
기본 비밀번호를 암호화해서 DB에 저장해둔 것이기 때문에 받아온 기본 비밀번호도 암호화해주고 나서 비교해줘야 한다. 만약 같다면 콜백으로 ture를 반환해 준다.
// models/User.js

// 비밀번호를 비교하는 메소드
userSchema.methods.comparePassword = function (plainPassword, cb) {
  const user = this;
  // plainPassword를 암호화해서 db에 있는 비밀번호와 비교
  bcrypt.compare(plainPassword, user.password, function (err, isMatch) {
    if (err) return cb(err);
    cb(null, isMatch);
  });
};
토큰을 생성하는 메서드
토큰을 생성하기 위해 jsonwebtoken을 다운로드하여 불러온다.
그리고 jsonwebtoken을 이용해 token을 생성해주며 콜백함수로 보내준다.
// models/User.js

const jwt = require("jsonwebtoken"); // 토큰을 생성하기 위해

// 토큰을 생성하는 메소드
userSchema.methods.generateToken = function (cb) {
  const user = this;
  // jsonwebtoken을 이용해서 token을 생성하기
  const token = jwt.sign(user._id.toHexString(), "secretToken");
  user.token = token;
  user.save(function (err, user) {
    if (err) return cb(err);
    cb(null, user);
  });
};
✅ 로그아웃 기능
로그아웃 기능은 간단하며 user의 id에 해당하는 token을 없애주면 된다.
// index.js

app.get("/api/users/logout", auth, (req, res) => {
  User.findOneAndUpdate({ _id: req.user._id }, { token: "" }, (err, user) => {
    if (err) return res.json({ success: false, err });
    return res.status(200).send({ success: true });
  });
});
✅ 인가
페이지마다 들어갈 수 있는지 없는지 권한 부여를 해줘야 한다.
그래서 먼저, auth middleware를 만들어준다.
요청한 토큰을 복호화한 후 유저를 찾는다. 여기서 findByToken은 아래에서 살펴보고
// middleware/auth.js

const { User } = require("../models/User");

// 인증 처리하는 곳
let auth = (req, res, next) => {
  // 클라이언트 쿠키에서 토큰을 가져온다.
  let token = req.cookies.x_auth;
  // 토큰을 복호화 한 후 유저를 찾는다.
  User.findByToken(token, (err, user) => {
    if (err) throw err;
    if (!user) return res.json({ isAuth: false, error: true });
    // 사용할 수 있게 해준다.
    req.token = token;
    req.user = user;
    next(); // 미들웨어에서 다음으로 넘어가는 것
  });
  // 유저가 있으면 인증 Okay
  // 유저가 없으면 인증 No
};

module.exports = { auth };
토큰을 복호화하는 메서드
유저 아이디를 이용해 유저를 찾은 다음에 클라이언트에서 가져온 token과 db에 보관된 토큰이 일치하는지 확인해 준다.
// models/User.js

// 토큰을 복호화하는 메소드
userSchema.statics.findByToken = function (token, cb) {
  const user = this;
  // 토큰을 decode 한다.
  jwt.verify(token, "secretToken", function (err, decoded) {
    // 유저 아이디를 이용해서 유저를 찾은 다음에
    // 클라이언트에서 가져온 token과 db에 보관된 토큰이 일치하는지 확인
    user.findOne({ _id: decoded, token: token }, function (err, user) {
      if (err) return cb(err);
      cb(null, user);
    });
  });
};
여기까지 auth 미들웨어를 통과해 왔다는 얘기는 auth가 ture라는 말이다.
// index.js

// auth 미들웨어를 통과해야 다음으로 넘어감
app.get("/api/users/auth", auth, (req, res) => {
  // 여기까지 미들웨어를 통과해 왔다는 얘기는 Authentication이 true라는 말
  res.status(200).json({
    _id: req.user._id,
    isAdmin: req.user.role === 0 ? false : true,
    isAuth: true,
    email: req.user.email,
    name: req.user.name,
    lastname: req.user.lastname,
    role: req.user.role,
    image: req.user.image,
  });
});
✅ 최종 전체 코드
GitHub - uiop5809/Login_Study: 로그인, 로그아웃, 회원가입 구현 with React, Node.js
로그인, 로그아웃, 회원가입 구현 with React, Node.js. Contribute to uiop5809/Login_Study development by creating an account on GitHub.
github.com
'🍞 Back-End > Node.js' 카테고리의 다른 글
| [Node.js] 구독하기(팔로우, 팔로워) 기능 (0) | 2022.12.29 |
|---|---|
| [Node.js] multer를 이용하여 React 파일 업로드 구현하기 (0) | 2022.12.28 |
| [Node.js] methods와 statics 차이 (0) | 2022.12.18 |
| [Node.js] 비밀 정보 보호하기 (github에 올리지 않기) (0) | 2022.12.18 |
| [Node.js] 개발 서버 실행과 빌드 (2) | 2022.09.30 |