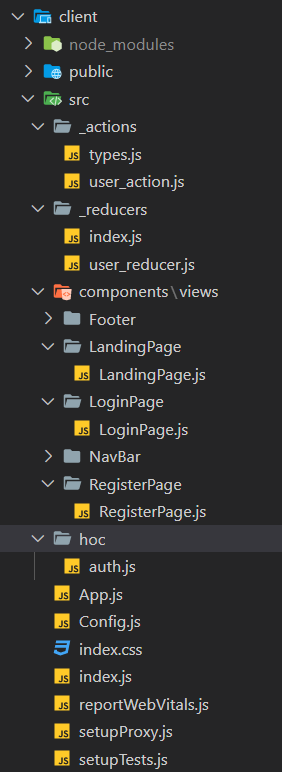
프로젝트 구조를 살펴보자면 아래와 같다.
기능구현을 우선시하기 위해 css는 최소한으로 했다!
먼저, 기본이 되는 페이지를 살펴보자.
✅ 라우팅 설정
/은 첫 페이지 랜딩페이지로 로그아웃 페이지
/login은 로그인 페이지
/register은 회원가입 페이지
react-router-dom v6으로 라우팅을 설정해 줬다.
// App.js

import React from "react";
import { BrowserRouter, Routes, Route } from "react-router-dom";
import LandingPage from "./components/views/LandingPage/LandingPage";
import LoginPage from "./components/views/LoginPage/LoginPage";
import RegisterPage from "./components/views/RegisterPage/RegisterPage";

function App() {
  return (
    <BrowserRouter>
      <Routes>
        <Route path="/" element={<LandingPage />} />
        <Route path="/login" element={<LoginPage />} />
        <Route path="/register" element={<RegisterPage />} />
      </Routes>
    </BrowserRouter>
  );
}

export default App;
✅ Redux 설정
Redux로 상태관리를 해줄 것이기 때문에 store를 생성해주고 가장 루트에 Provider를 설정해 줬다.
// index.js

import React from "react";
import ReactDOM from "react-dom/client";
import "./index.css";
import App from "./App";
import reportWebVitals from "./reportWebVitals";
import { Provider } from "react-redux";
import { applyMiddleware, createStore } from "redux";
import promiseMiddleware from "redux-promise"; // promise를 사용하기 위한 미들웨어
import ReduxThunk from "redux-thunk"; // 비동기를 사용하기 위한 미들웨어
import Reducer from "./_reducers/index.js";

// 원래 store는 객체밖에 못받기 때문에 promise와 function을 사용하기 위해 미들웨어를 사용한다.
const createStoreWithMiddleware = applyMiddleware(
  promiseMiddleware,
  ReduxThunk
)(createStore);

const root = ReactDOM.createRoot(document.getElementById("root"));
root.render(
  <React.StrictMode>
    <Provider
      store={createStoreWithMiddleware(
        Reducer,
        window.__REDUX_DEVTOOLS_EXTENSION__ &&
          window.__REDUX_DEVTOOLS_EXTENSION__()
      )}
    >
      <App />
    </Provider>
  </React.StrictMode>
);

// If you want to start measuring performance in your app, pass a function
// to log results (for example: reportWebVitals(console.log))
// or send to an analytics endpoint. Learn more: https://bit.ly/CRA-vitals
reportWebVitals();
reducers 설정
// _reducers/index.js

import { combineReducers } from "redux";
import user from "./user_reducer";

// 여러개의 reducer를 하나로 합쳐준다.
const rootReducer = combineReducers({
  user,
});

export default rootReducer;
// _reducers/user_reducer.js
import { LOGIN_USER, REGISTER_USER, AUTH_USER } from "../_actions/types";
export default function (state = {}, action) {
switch (action.type) {
case LOGIN_USER:
return { ...state, loginSuccess: action.payload };
break;
case REGISTER_USER:
return { ...state, register: action.payload };
break;
case AUTH_USER:
return { ...state, userData: action.payload };
break;
default:
return state;
}
}
✅ 회원가입 페이지
회원가입이 되어야 로그인이 가능하니까 먼저 회원가입부터 살펴보자.
dispatch에 action을 담아, 만약 응답이 성공이라면 /(루트 페이지)로 가고 아니라면 회원가입에 실패했다는 알림을 뜨게 한다. 한 가지 더 추가해야 될 것은 비밀번호 확인을 해주는 것이다.
// components/views/RegisterPage.js

import React, { useState } from "react";
import { useNavigate } from "react-router-dom";
import { useDispatch } from "react-redux";
import { registerUser } from "../../../_actions/user_action";
import Auth from "../../../hoc/auth";

function RegisterPage() {
  const [email, setEmail] = useState("");
  const [name, setName] = useState("");
  const [password, setPassword] = useState("");
  const [confirmPassword, setConfirmPassword] = useState("");

  const dispatch = useDispatch();
  const navigate = useNavigate();

  const handleChange = (e) => {
    const { name, value } = e.target;
    if (name === "email") setEmail(value);
    else if (name === "name") setName(value);
    else if (name === "password") setPassword(value);
    else if (name === "confirmPassword") setConfirmPassword(value);
  };

  const handleSubmit = (e) => {
    e.preventDefault();

    if (password !== confirmPassword) {
      return alert("비밀번호와 비밀번호 확인이 같아야 합니다.");
    }

    const body = {
      email: email,
      name: name,
      password: password,
    };

    dispatch(registerUser(body)).then((res) => {
      if (res.payload.success) {
        navigate("/login");
      } else {
        alert("회원가입에 실패하셨습니다.");
      }
    });
  };

  return (
    <div
      style={{
        display: "flex",
        justifyContent: "center",
        alignItems: "center",
        width: "100%",
        height: "100vh",
      }}
    >
      <form
        style={{ display: "flex", flexDirection: "column" }}
        onSubmit={handleSubmit}
      >
        <label>Email</label>
        <input
          type="email"
          name="email"
          value={email}
          onChange={handleChange}
        />
        <label>Name</label>
        <input type="text" name="name" value={name} onChange={handleChange} />
        <label>Password</label>
        <input
          type="password"
          name="password"
          value={password}
          onChange={handleChange}
        />
        <label>Confirm Password</label>
        <input
          type="password"
          name="confirmPassword"
          value={confirmPassword}
          onChange={handleChange}
        />

        <br />
        <button>회원가입</button>
      </form>
    </div>
  );
}

export default Auth(RegisterPage, false);
action을 살펴보자면 axios로 서버에 body를 보내고 응답 데이터를 리턴해준다.
그렇기 때문에 위의 코드에서도 응답 데이터를 쓸 수 있는 것이다.
// user_action.js

import axios from "axios";
import { LOGIN_USER, REGISTER_USER, AUTH_USER } from "./types";

export function registerUser(dataToSubmit) {
  const request = axios
    .post("/api/users/register", dataToSubmit)
    .then((res) => res.data);
  return {
    type: REGISTER_USER,
    payload: request,
  };
// types.js
export const REGISTER_USER = "register_user";
✅ 로그인 페이지
다음으로 로그인 페이지를 살펴보자. 회원가입과 비슷한 것이 많다.
// LoginPage.js

import React, { useState } from "react";
import { useNavigate } from "react-router-dom";
import { useDispatch } from "react-redux";
import { loginUser } from "../../../_actions/user_action";
import Auth from "../../../hoc/auth";

function LoginPage() {
  const dispatch = useDispatch();
  const navigate = useNavigate();

  const [email, setEmail] = useState("");
  const [password, setPassword] = useState("");

  const handleChange = (e) => {
    const { value, type } = e.target;
    if (type === "email") setEmail(value);
    else if (type === "password") setPassword(value);
  };

  const handleSubmit = (e) => {
    e.preventDefault();

    const body = {
      email: email,
      password: password,
    };

    dispatch(loginUser(body)).then((res) => {
      if (res.payload.loginSuccess) {
        navigate("/");
      } else {
        alert("Error");
      }
    });
  };

  return (
    <div
      style={{
        display: "flex",
        justifyContent: "center",
        alignItems: "center",
        width: "100%",
        height: "100vh",
      }}
    >
      <form
        style={{ display: "flex", flexDirection: "column" }}
        onSubmit={handleSubmit}
      >
        <label>Email</label>
        <input type="email" value={email} onChange={handleChange} />
        <label>Password</label>
        <input type="password" value={password} onChange={handleChange} />

        <br />
        <button>Login</button>
      </form>
    </div>
  );
}

export default Auth(LoginPage, false);
action을 살펴보자면 회원가입과 똑같이 axios로 서버에 body를 보내고 응답 데이터를 리턴해준다.
// user_action.js

import axios from "axios";
import { LOGIN_USER, REGISTER_USER, AUTH_USER } from "./types";

export function loginUser(dataToSubmit) {
  const request = axios
    .post("/api/users/login", dataToSubmit)
    .then((res) => res.data);
  return {
    type: LOGIN_USER,
    payload: request,
  };
}
// type.js
export const LOGIN_USER = "login_user";
✅ 로그아웃 페이지 (랜딩 페이지)
로그인이 되어있을 때 로그아웃을 한다면, 로그인 페이지로 이동하게 만들었고
로그인이 되어있지 않은데 로그아웃을 하려고 하면 로그아웃 실패라고 알림이 뜨게 만들었다.
// components/views/LandingPage.js

import React, { useEffect } from "react";
import axios from "axios";
import { useNavigate } from "react-router-dom";
import Auth from "../../../hoc/auth";

function LandingPage() {
  const navigate = useNavigate();

  const handleClick = () => {
    axios.get("/api/users/logout").then((res) => {
      if (res.data.success) {
        navigate("/login");
      } else {
        alert("로그아웃 실패");
      }
    });
  };

  return (
    <div
      style={{
        display: "flex",
        justifyContent: "center",
        alignItems: "center",
        width: "100%",
        height: "100vh",
      }}
    >
      <h2>시작페이지</h2>
      <button onClick={handleClick}>로그아웃</button>
    </div>
  );
}

export default Auth(LandingPage, null);
✅ 인가 HOC
페이지에 따라 출입을 가능하게 할지 말지 조절할 수 있는 컴포넌트를 생성해 보자.
여기서 HOC란 컴포넌트를 인자로 넣고 새로운 컴포넌트를 만든다는 것이다.
> null은 아무나 출입 가능한 페이지
> true은 로그인한 유저만 출입 가능한 페이지
> false는 로그인한 유저는 출입 불가능한 페이지
아까 로그인, 로그아웃, 회원가입 페이지를 export default 부분을 살펴보면 Auth(~Page, xxx)라고 적혀있을 것이다. 이처럼 첫 번째 인자엔 컴포넌트를 적고, 두 번째 인자엔 권한을 부여하면 된다. xxx부분에 null, true, false가 들어가게 되는데 회원가입 페이지와 로그인 페이지는 로그인한 유저가 출입하면 안 되니까 false, 랜딩 페이지는 아무나 출입 가능하니까 null로 설정해 준다.
// hoc/auth.js

import React, { useEffect } from "react";
import { useDispatch } from "react-redux";
import { auth } from "../_actions/user_action";
import { useNavigate } from "react-router-dom";

export default function (SpecificComponent, option, adminRoute = null) {
  // null => 아무나 출입이 가능한 페이지
  // true => 로그인한 유저만 출입이 가능한 페이지
  // false => 로그인한 유저는 출입 불가능한 페이지

  function AuthenticationCheck(props) {
    const dispatch = useDispatch();
    const navigate = useNavigate();

    useEffect(() => {
      dispatch(auth()).then((res) => {
        console.log(res);

        if (!res.payload.isAuth) {
          // 로그인 하지 않은 상태
          if (option) {
            navigate("/login");
          }
        } else {
          // 로그인 한 상태
          if (adminRoute && !res.payload.isAdmin) {
            // 관리자가 아닌데 관리자 페이지로 들어가려고 할 때
            navigate("/");
          } else {
            if (!option) navigate("/");
          }
        }
      });
    }, []);

    return <SpecificComponent />;
  }

  return AuthenticationCheck;
}
✅ 최종 전체 코드
GitHub - uiop5809/Login_Study: 로그인, 로그아웃, 회원가입 구현 with React, Node.js
로그인, 로그아웃, 회원가입 구현 with React, Node.js. Contribute to uiop5809/Login_Study development by creating an account on GitHub.
github.com
'🍞 FrontEnd > React' 카테고리의 다른 글
| [Redux] Redux-saga를 알아보자 (0) | 2023.01.03 |
|---|---|
| [React] 비디오 업로드(multipart/form-data) 기능 (0) | 2022.12.29 |
| [React/Node.js] 프론트 서버와 백 서버 한 번에 키기 (0) | 2022.12.19 |
| [React/Node.js] CORS 이슈, Proxy 설정 (0) | 2022.12.19 |
| [React] React Suspense이란? (0) | 2022.12.02 |